Pages

Sunday, December 23, 2012

DIY Bookends


Can I just say, I stinkin love Pinterest!?
Its funny, in college one of my professors encouraged us, no- required us- to keep a "box" full of things that inspired us. Twyla Tharp in, The Creative Habit: Learn It and Use It for Life, encourages people to do the same, and that semester we read many excerpts from her book. I actually took it out from the library this summer as part of my Seminar in Creativity class.... I'm getting off topic.
My box was full of pictures of eyes, women adorn with fabrics that flowed , patterned and whimsical interiors and skate/ pop punk culture pictures, all torn from the pages of any magazines I could get my hands on.
Pinterest is kinda like that box. Many of the things I "tear from pages" are now lessons, and less inspiration for my own work. (Which is a shame, but once my Master's degree is done, I need to will schedule a "date" night at least once a month for me and my art supplies.) But my boards are a place that I can keep going back to and find inspiration from. And like the satisfying feeling I got when I used the box to complete my textile design senior show, its such a pleasure to find an idea online and make it your own.

So the impetus for this rant:
Originally pinned from: PBteen
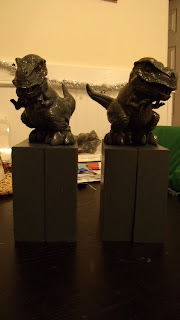
When I saw this, I immediately thought of my boyfriend. But swap the dogs for dinosaurs and its the perfect (hopefully) Christmas present.

I started this project in early November. I'm sure that the original is made in a factory and probably a mold of some sort, but I knew I could figure a way to put this together. I planned to find two plastic dinosaurs and some scrap wood bases and spray paint everything.
I started at a toy store looking for cheap, plastic dinosaurs. But there was no such thing! All the dinosaurs were EACH over ten bucks. They were almost like little scale models, and the sales staff couldn't think of anything of a decent size that they carried.
I decided to look online.
I found two of the same, about four inch tall, dinos on eBay and scooped em up as fast as I could.

The base was the next struggle.
My local big box stores didn't have solid blocks of wood, that were not curved like chair feet, that would work. They also wouldn't cut a four by four, so they say, nor did they have a scrap bin. So I asked a couple of friends but then it came down to crunch time. I asked a custodian for any suggestions and they pointed me to a pile of scrap wood! AND offered to cut it for me. At home of course. Perfect!
I had to glue two pieces together, which is my only qualm about the final product, but I LOVE how my dinosaur bookends came out. I really hope my boyfriend likes them as much as I do.

Saturday, December 22, 2012

Middle School Art "Choice" Day

First of all, this was the longest week on record! I was as bad as the kids, anxious for Winter Break, but had a crazy schedule and a cold to contend with before making it to Friday.
As I looked around my classroom yesterday afternoon though, I realized how lucky I am. Despite my hemming and hawing trying to figure out what to do this week, my kids were so content with what they were doing in the art room. That was a good feeling. And as I took a step back and observed, I realized that I am so lucky: I have a job that I love, great students and a supportive staff. The tragedy in the news mixed with the feeling of the holidays made this week surreal for me, but in the end I'm glad I had that little moment to step back, enjoy and be thankful.
__________________________________________________________________________________

Wednesday, December 12, 2012

Creative Minds Tempera and India Ink "Batik"


I always LOVE this activity!
I knew after the first meeting of Creative Minds that this group of kids could handle the long term dedication needed to see this to fruition. I first did this with a group of elementary school kids in preparation for our first ever "After School Art Show." The image above, of Venus fly traps, is probably still my favorite. (Side story, this student was in 4th grade when she did this. I then had her as an art student in 8th grade when I was finally hired in the public schools. I now see her from time to time at the high school. Side, side note, five years later after I no longer work for the program, the "After School Art Show" still continues each spring!)

So I probably found this idea over five years ago at Kinder Art.
Since then, I have done this with three groups of kids, two of which were after school art clubs. When groups only meet once a week, this can take up to a month to complete. So heres whats up:

  1. Plan a design. I typically talk about motif and random pattern. Some of the most interesting works have been just simple shapes.
  2. Draw the design on larger paper using chalk. I have always used the standard 12x18 manila, school grade paper. 
  3. Paint the design with tempera paint paying careful attention NOT to paint on the chalk lines. It is also a good idea to apply the paint heavily. Not so heavy it cracks when it dries, but heavy keeping in mind that some may wash away later.
  4. When the paint is dry, evenly cover with semi diluted India ink. Adding some water I think helps to wash it away later. When applying, be careful not to "scrub" the ink into the layer of paint. I typically use a 2-3 inch wide brush so that only a few lines of ink are needed to fill the page. Due to the staining nature of the ink too, I have kids paint at a station.
  5. After the ink is dry, run a faucet to warm water. Using a board to support the page, have the warm water run over the inked page. I have used lunch trays in the past. If needed, use a paint brush to gently remove the ink. I reiterate to students that the more wet the page becomes, the more fragile it is. So they need to be super careful when rinsing the ink. I also explain that the more they rinse, the more paint that is under the ink, will rinse off too.


A handful of my Creative Minds kids are at the point of needing to rinse the ink. Hopefully I will have more images tomorrow.

UPDATE:
Below are a handful of the final products.
Unfortunately, I think most of these are examples of washing off too much ink. In fact the student who created the first design told me that she felt like she washed off too much. Still a beautiful image though!


Water and fire

The seasons


detail of above

Monday, November 26, 2012

Fall Reflections


I've found this year that every once in awhile I need to throw in a one day lesson. Or at least vary it from long term (more than two classes) to short term activities with my middle school students. About two years ago I found this lesson on The Incredible Art Department and felt like it really fit in as a transition from printmaking to painting with a focus on nature, which upcoming in sixth grade.  

Before students arrive, premix a light blue. I made a big batch in a large yogurt container that has lasted for my five sections. Also, figure out how you will dispense paint. I used a method like you see below and use red, yellow, green and the premixed blue (tempera)

  1. At the beginning of the lesson, I have the word MONOPRINT on the board. I always start by asking what the prefix "mono" means. Usually one or two students knows that it means one. I then explain the difference between the prints we just did and what we will be doing.
    • This year, I am super lucky to have a document camera, so I got to do the activity along with my students. I went back to my old saying of "watch what I do, then you do it too." However, I also explained, that once I show students, if they have another idea, and its still within the materials available AND printing, then go for it!
  2. Fold paper in half like a hot dog.
  3. Add a land mass by painting above the fold. Before the paint dries, refold the paper and apply pressure.
  4. Add bare trees by using oil pastel heavy and dark. Refold the paper and use a popsicle stick to rub the paper. The pastel should "jump" to the other side.
  5. Add leaves and print as before
  6. Paint and print the sky in sections as the tempera can dry fast.


Tuesday, November 13, 2012

Printed Calaveras

This lesson is straight from Calvert Canvas.
However, instead of linoleum, we used foam AND mounted two (out of three) instead of four prints.

I started my lesson with this image:
I used Visual Thinking Strategies to get student's minds going. 
I asked, "Whats going on in this picture?"
Eventually students started to come up with a story, after pointing out elements of the work, and I would ask "What evidence do you have of that?" in order to have the class see the visual clues. As students were talking, I would point to what they were talking about and paraphrase. 
I think this activity, in addition to the rest of the power point presentation, helped students understand that a skull and skeleton might have different meanings in other cultures. I have done this lesson before and this has been the only time where the majority of the calaveras are not creepy and frightening.  

First we viewed the power point and practiced drawing a calavera as other students completed the previous assignment.
The next class, we revisited symmetry, finalized our calaveras and traced them onto foam.
Finally, after a printmaking demo, we created at least three prints. This took about two classes. At each table, there were written directions in case students forgot about the demo from the previous class. I was stationed with the ink, in order to monitor how much was being given out. We used a variety of colors and I pretty much used all of the random papers that were donated over the last year. 


 I love that the student above wanted to make her calavera into an animal. I love her enthusiasm too. 
I think that if I were to do this again, I would make the foam and paper smaller. The prints and foam above were 6x9. I was afraid that 3x4.5 would be too small to really get detail. However, I think the smaller size would balance out the negative space, as the majority of students had trouble drawing large.  


Monday, November 12, 2012

Creative Minds Wks 1 & 2

In addition to starting a new position at the high school and my two graduate courses, I have taken on an after school club called Creative Minds. For the last few years, the school's secretary along with one other person, ran the club, doing a variety of crafts and even cooking. Between her duties in the office and the club, it became too much. Recognizing the importance of such a club for middle school kids, I offered to keep it running on my own.
The kids are great! I have had some rough weeks lately, but I look forward to hanging out with my Creative Minds kids each week. Here's what we have been up to so far:

The first week we designed silhouetted windows.
  • We started by using watered down Elmer's glue to layer pieces of tissue paper onto a white page. Next, we cut a frame out of black paper to look like a window. Some were traditional like this one, while others created different outlines. 
  • Finally, students used the remaining black paper/ scraps to cut out bats, cats, pumpkins, trees and haunted houses. These pieces were then glued into the open window panes. 
The above image is an unfinished example.

The following week we used scratch board and white paper, inspired by  Art Projects for Kids Scratch Tree


Some kept with the Halloween theme while others, like to top two, were inspired by video games and cartoon characters.

For the last two weeks, Creative Minds started painting designs for an India ink batik. I love how these always turn out. This will be the third time I have used this lesson. The black of the ink makes the designs really bold and graphic. The kids are always in mourning almost that they have to paint over their designs with ink, but thrilled when they get to wash it all away. I will be sure to post after Thanksgiving break.

Wednesday, October 31, 2012

Happy Halloween


Inspired by my Modern Day Cave Painting lesson, this is my Keith Haring pumpkin!

Saturday, October 27, 2012

Symmetrical Monochromatic Paintings 2012


(I cropped these in Picasa, but for some reason it didn't show up here. Sorry)

I LOVE this lesson.
So many kids are successful and I think they really have fun mixing the paint.
This year I attempted to talk about color, line and emotion, but since they took so long to complete, the idea got lost in translation. Original line choices and color were supposed to be based on an emotion.
I'm really proud of my students and hope that this lesson has set the tone for the remainder of the year.

Friday, October 26, 2012

Seventh Grade Mandalas


This was my second time doing this lesson. I found it before school started last year in Arts and Activities (September (?) 2011).  In the magazine the name design is called a kaleidoscope design and originally I did it in order to learn my new students names. This year, I knew my student's name (although I am still having trouble with the twins! I feel awful about that) and attempted to link the activity to social students. I introduced a "mandala" as an ancient design used for meditation and reflection, that represents us and our inner world.

Class #1
After introducing the term mandala, I displayed an example using my brand new, spectacular document camera. I asked how the example is a reflection of me? After a couple seconds of silence, a few rumbles started and I poinedt out to students that I spelled out my name. I then asked how balance was used? (We had reviewed the elements and principles the week before, so balance was fresh in their minds) I drew on the whiteboard, over my projected image, all the lines of symmetry and introduced radial symmetry. At that point, I passed out photocopies of a 45 degree triangle and walked students through the steps:
  1. Write name in block or bubble letters inside the triangle. Think about how your name will be reflected. If you want your letters to touch, where should you draw it?
  2. Add lines and shapes to break up the remaining negative space.
  3. Trace lines heavy and dark.
  4. Fold paper along the bottom line of the triangle.
  5. Keeping the paper folded, trace the lines that can be seen through, making sure to apply pressure in order to make the lines "jump" to the blank space on the inside of the folded paper. (Hopefully at the very least, students can finish up to this step in 40 minutes)
  6. Open the paper and retrace the lines that "jumped" so that the photocopier can see them.
That should bring the class to the end of a 42ish minute period. At the end of each day, I made 4 photocopies of the completed pages. I made sure students knew upfront that I needed the pages done, so that I could help them by photocopying. If they didn't finished, it would make more work for them. At the very least, if students finished step 5, you could photo copy the front and the back four times each.

Class #2
  1. Pass out 12x12 paper and instruct students to divide the page evenly into four quadrants.  I did a quick refresher how to draw tally marks and connect the dots.
  2. Each photocopy will be cut and pasted into a quadrant.
  3. Review symmetry including  how to apply color symmetrically and go for it! We used a combination of Crayola classic and bold conical and thin tip markers. For the background/ negative space students could use color pencils


 Sorry these pictures are on a weird angle. The bulletin boards I hung these up on are above lockers!

Thursday, October 18, 2012

MFA and ME

The last couple of weeks have flown by! We are officially halfway through the first term at both the high school (which has four terms) and the middle school (which has three terms). I have been trying to grade works as they come it but it always feels like ALL of my students finish at once. All 375+! I feel like I am constantly trying to play catch up. I've slowly started to put together work for display boards too and hope to have some pictures tomorrow. Between grading, two graduate courses, an after school club and life, I have just enough time to read a few pages in the book I started in August before I fall asleep at night.

And our weekends are pretty busy too!
At the end of September, Smithsonian Magazine sponsored a free museum day. Our friend and her seventh grade son asked if we wanted to go with them to the Museum of Fine Arts for the afternoon and I couldn't say no. The price was right!


I seem to have only taken pictures of Babylonian and Greek art. I was super excited to have stumbled upon what appears to be part of the Gate of Ishtar. I only learned about the gate and the ancient walled city a few years ago. It was pretty cool to see in person. I'd like to make some paper mache Greek pottery this year with seventh grade, hence the other images, but we will have to see how the time and behavior plays out over the next few months. In Social Studies, they don't cover Ancient Greece and Roman until after winter break.
It was really nice to spend time with people outside of school and work and to share something I love so much. I even bumped into an old college classmate working at the museum!

A couple weeks later, we visited my best friend and her husband up in Maine. The two moved at the end of August due to a job transfer. We started our journey stuck in a hour's worth of traffic before we even left the city. Stupid me should have driven around to go north, but I wasn't thinking.


I really like the way this picture came out. I will have to print it and put it in my inspiration box. (As if I've had time to make anything!)

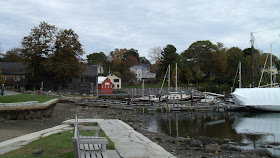
Our friends now live on the coast of Maine, as you can see from the pictures. We walked around a few different coastal towns, including Belfast. We even stumbled upon a little brewery that offered free tastings! They must have known we were coming. And we spent the rest of the weekend relaxing. It was so nice to catch up and realize that no matter the miles between us, or a change in location, our friendship is still the same. It was very comforting.(You can read more about the transition from life in the city to small town ME at Can't Get There from Here)

While I hope to update this weekend with an actual lesson, it looks to be another busy one with family dinners and our annual Pumptoberfest where all our friends bring pumpkin flavored food to a wonderful pot luck. This year there will even be a crafts table for the little ones as everyone seemed to have kids over the last few years!